Introduction
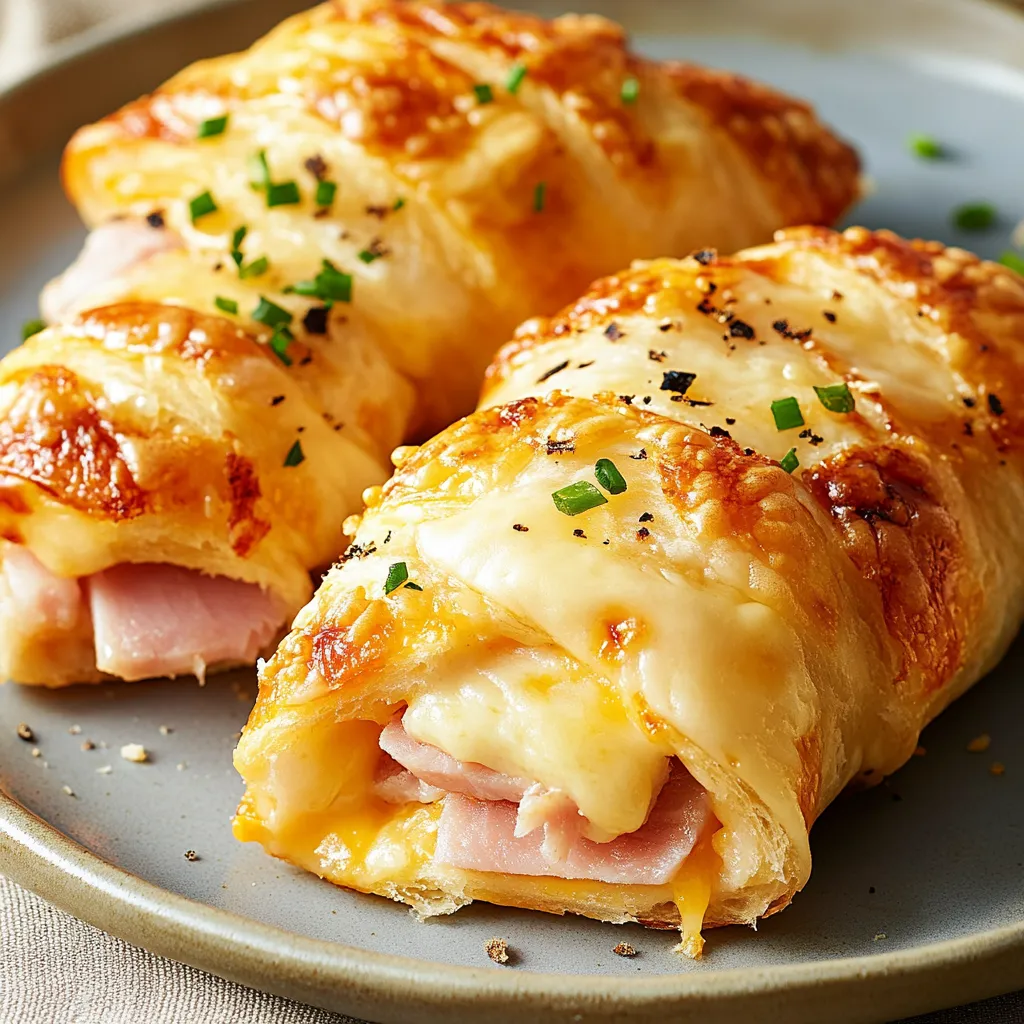
Craving a quick, satisfying meal that delivers maximum flavor with minimal effort? Look no further than these delicious Cheesy Garlic Chicken Wraps. Perfect for busy weeknights, lunch boxes, or casual entertaining, these wraps combine tender chicken, gooey cheese, and aromatic garlic in a portable, customizable package. Whether you’re meal prepping for the week ahead or need a last-minute dinner solution, this Cheesy Garlic Chicken Wraps recipe delivers restaurant-quality taste with simple, everyday ingredients. The combination of savory chicken, melted cheese, and the warm embrace of garlic creates a comfort food experience that’s both satisfying and convenient – ready to transform your mealtime routine with minimal fuss but maximum flavor impact.
These Cheesy Garlic Chicken Wraps have become a reader favorite for good reason – they strike the perfect balance between convenience and indulgence. The recipe has its roots in classic Mediterranean and American fusion cuisine, bringing together elements that appeal to almost every palate. Many home cooks have discovered that these wraps are not only delicious for immediate consumption but also work beautifully for batch cooking and meal planning, making them a practical solution for today’s busy lifestyles.
Unlike many quick meals that sacrifice quality for convenience, these Cheesy Garlic Chicken Wraps never compromise on flavor. The secret lies in building layers of complementary tastes – from the savory chicken seasoned with aromatic herbs to the rich, creamy garlic-infused cheese spread that brings everything together. Let’s dive into why this recipe deserves a permanent spot in your weeknight dinner rotation.
Why You’ll Love These Cheesy Garlic Chicken Wraps
Why You’ll Love These Cheesy Garlic Chicken Wraps
Quick & Convenient
- Ready in just 30 minutes – perfect for busy weeknights!
- No special equipment needed – just basic kitchen tools
- Perfect hand-held meal that minimizes cleanup
Versatile & Adaptable
- Completely customizable with your favorite veggies and cheese varieties
- Perfect for using up leftover rotisserie chicken
- Adaptable for various dietary restrictions with simple swaps
Family-Friendly
- Kid-friendly while still sophisticated enough for adults
- Great for teaching cooking basics to beginners and children
- The cheesy garlic flavor combination is universally beloved
Practical Benefits
- Great for meal prep – make ahead and enjoy throughout the week
- Easy to transport for lunches, picnics, or on-the-go meals
- Budget-friendly ingredients that won’t break the bank
Healthy & Delicious
- Balanced nutrition with protein, vegetables, and carbs in one convenient package
- A great way to incorporate more vegetables into your diet
- Restaurant-quality taste with home-cooked benefits
The versatility of these Cheesy Garlic Chicken Wraps is truly impressive. They can be as simple or as elaborate as you want them to be. Starting with the basic recipe, you can gradually experiment with different ingredients, spice levels, and cooking techniques to make this recipe uniquely yours. Many home cooks report that these wraps have become a “blank canvas” for culinary creativity in their households, with family members requesting their own signature variations.
The History Behind Cheesy Garlic Chicken Wraps
While not exactly an ancient recipe, the concept of combining meat, vegetables, and dairy in a portable bread-based container has existed in various culinary traditions for centuries. The modern wrap as we know it gained popularity in the United States during the 1990s as a healthier alternative to sandwiches and a quick meal solution for increasingly busy lifestyles.
The specific combination of chicken, garlic, and cheese in a wrap format represents the perfect marriage of convenience foods with comfort food flavors. Garlic has been celebrated for both its flavor and potential health benefits since ancient times, while chicken and cheese provide satisfying protein that appeals to eaters of all ages.
As home cooking has evolved to embrace both convenience and quality, recipes like these Cheesy Garlic Chicken Wraps have become staples in modern kitchens. They represent our desire for meals that are quick yet don’t taste “rushed,” nutritious without being boring, and flexible enough to adapt to changing dietary preferences and ingredient availability.
Ingredients for Cheesy Garlic Chicken Wraps
For the Chicken Filling:
- 2 tablespoons olive oil
- 1½ pounds boneless, skinless chicken breasts, cut into thin strips
- 4 cloves garlic, minced
- 1 teaspoon Italian seasoning
- ½ teaspoon paprika
- Salt and pepper to taste
- 1 medium onion, thinly sliced
- 1 red bell pepper, sliced into strips
- 1 yellow bell pepper, sliced into strips (optional)
For the Cheesy Garlic Spread:
- 4 ounces cream cheese, softened
- 2 tablespoons mayonnaise
- 2 cloves garlic, minced
- ½ cup mozzarella cheese, shredded
- ¼ cup Parmesan cheese, grated
- 1 tablespoon fresh parsley, chopped
- ½ teaspoon dried oregano
For Assembly:
- 6 large flour tortillas (10-inch size)
- 2 cups mixed cheese (cheddar and mozzarella), shredded
- Fresh spinach leaves (optional)
- Fresh tomato slices (optional)
- Sliced avocado (optional)
- Fresh cilantro or basil leaves (optional)
Ingredient Quality Tips for Perfect Cheesy Garlic Chicken Wraps
The quality of your ingredients will significantly impact the final flavor of your Cheesy Garlic Chicken Wraps. Here are some tips for selecting the best components:
- Chicken: If possible, use air-chilled chicken breasts for better texture and flavor. They tend to be less watery than conventionally processed chicken.
- Garlic: Fresh garlic will always provide the most vibrant flavor. Look for firm bulbs with tight skin. For even more pronounced garlic flavor, roast a few extra cloves and add them to the spread.
- Cheese: Block cheese that you grate yourself melts much better than pre-shredded varieties, which contain anti-caking agents. For the best melting properties, choose full-fat cheeses rather than reduced-fat options.
- Tortillas: Flour tortillas labeled “burrito size” work best for these wraps. Look for fresh, pliable tortillas without tears or dry edges. Some specialty stores offer flavored tortillas like spinach or tomato that can add an extra dimension to your wraps.
- Vegetables: The freshness of your vegetables matters. Bell peppers should be firm and glossy, and onions should be hard with dry outer skins. If using optional ingredients like spinach or tomatoes, make sure they’re at peak freshness.
Ingredient Substitutions:
- For a gluten-free option, use gluten-free tortillas or large lettuce leaves
- Replace chicken with grilled portobello mushrooms for a vegetarian version
- Greek yogurt can substitute for mayonnaise for a lighter option
- For a dairy-free version, use dairy-free cream cheese and cheese alternatives
- Try ground turkey or sliced steak instead of chicken for a different protein experience
- Swap spinach for arugula to add a peppery kick
- Use whole wheat or spinach tortillas for added nutritional benefits
- Consider corn tortillas for an authentic Mexican twist (though they may be smaller and require different folding techniques)
- Substitute fresh herbs like basil or cilantro for parsley if preferred
- Add a tablespoon of pesto to the spread for an Italian-inspired variation

How to Make Cheesy Garlic Chicken Wraps – Step by Step
Step 1: Prepare the Chicken
- Heat olive oil in a large skillet over medium-high heat.
- Season chicken strips with salt, pepper, paprika, and half of the Italian seasoning.
- Add chicken to the hot skillet and cook for 5-6 minutes until golden brown and nearly cooked through.
- Add the minced garlic and cook for another 30 seconds until fragrant.
- Remove chicken to a plate and set aside.
For the juiciest chicken results, avoid overcrowding your pan – cook in batches if necessary. The chicken should sizzle when it hits the pan, indicating the temperature is high enough to sear rather than steam the meat. A good sear locks in moisture and creates those delicious caramelized edges that add so much flavor to your Cheesy Garlic Chicken Wraps.
Step 2: Cook the Vegetables
- In the same skillet, add a bit more oil if needed.
- Add sliced onions and bell peppers.
- Sauté for 4-5 minutes until vegetables are tender-crisp.
- Season with remaining Italian seasoning, salt, and pepper.
- Return chicken to the skillet, stir to combine with vegetables, and remove from heat.
The key to perfect vegetables in your Cheesy Garlic Chicken Wraps is to cook them just until they begin to soften but still maintain a slight crunch. This texture contrast will make your wraps much more interesting to eat. Using the same pan that cooked the chicken allows the vegetables to absorb all those wonderful flavors left behind, adding depth to the final dish.
Step 3: Prepare the Cheesy Garlic Spread
- In a medium bowl, combine softened cream cheese and mayonnaise.
- Add minced garlic, mozzarella cheese, Parmesan cheese, chopped parsley, and dried oregano.
- Mix until well combined and creamy.
- Taste and adjust seasonings if needed.
The cheesy garlic spread is truly the heart of this recipe and what makes these wraps special. Make sure your cream cheese is properly softened for the smoothest texture – leaving it at room temperature for about 30 minutes should do the trick. You can also microwave it for 10-15 seconds if you’re short on time. Don’t skimp on the fresh garlic here; it infuses the spread with an aromatic quality that dried garlic simply cannot match.
Step 4: Assemble the Wraps
- Warm tortillas in the microwave for 15-20 seconds to make them more pliable.
- Spread a generous amount of the cheesy garlic mixture onto each tortilla.
- Place a portion of the chicken and vegetable mixture in the center of each tortilla.
- Sprinkle with additional shredded cheese.
- Add optional fresh spinach and tomato slices if desired.
- Fold in the sides of the tortilla, then roll up tightly from the bottom.
Proper assembly technique is crucial for Cheesy Garlic Chicken Wraps that hold together well. Be sure to leave about an inch of space around the edges of your tortilla when adding fillings. This empty border allows for easier rolling and helps prevent ingredients from spilling out. The order of ingredients matters too – starting with the spread creates a moisture barrier that helps prevent the tortilla from becoming soggy.
Step 5: Cook the Wraps
- Heat a clean skillet or griddle over medium heat.
- Place the assembled wraps seam-side down on the skillet.
- Cook for 2-3 minutes per side until golden brown and the cheese is melted.
- Alternatively, you can wrap them in foil and bake at 350°F (175°C) for 10 minutes.
The final cooking step is what transforms these from good wraps to great ones. The heat not only melds all the flavors together but also creates that irresistible contrast between the crispy exterior and warm, gooey interior. If you’re cooking multiple wraps, keep the finished ones warm in a 200°F oven while you complete the batch.
Step 6: Serving Suggestions
- Let the wraps cool for 2-3 minutes before slicing diagonally.
- Serve with additional sides like sour cream, salsa, or guacamole.
- Garnish with fresh herbs for an appealing presentation.
- For a complete meal, pair with a simple side salad or soup.
The brief resting period before cutting is more important than you might think. It allows the melted cheese to set slightly, making the wraps easier to handle and preventing the filling from spilling out immediately upon cutting. This small step makes a big difference in the presentation and eating experience of your Cheesy Garlic Chicken Wraps.
Pro Tips for Making the Best Cheesy Garlic Chicken Wraps
- Marinate the chicken in advance with garlic, olive oil, and herbs for even more flavor depth. Even a 30-minute marinade can dramatically improve flavor.
- Don’t overcook the vegetables – keep them slightly crisp for better texture in your wraps. They’ll continue cooking slightly from residual heat.
- Toast the tortillas lightly before assembling for extra structure and to prevent sogginess. This creates a barrier that keeps wet ingredients from softening the wrap.
- Let the wraps rest for 2-3 minutes after cooking before cutting to help them hold together. This allows the cheese to set slightly.
- Customize the spice level by adding red pepper flakes or hot sauce to the chicken mixture. Start with a small amount and adjust to taste.
- The secret to the best cheesy garlic chicken wraps is layering flavors – season each component well rather than relying on just one element for taste.
- Grate your own cheese instead of using pre-shredded for better melting properties. Pre-shredded cheese contains anti-caking agents that can prevent smooth melting.
- Make a double batch of the chicken filling and freeze half for quick wrap assembly later. The filling freezes well for up to 3 months.
- Control moisture levels in your filling to prevent soggy wraps. Drain excess liquid from vegetables and allow hot ingredients to cool slightly before assembly.
- For meal prep, store components separately and assemble just before eating to maintain optimal texture.
- Experiment with different wrapping techniques such as envelope-style, burrito-style, or even folded quesadilla-style for variety.
- For extra garlic flavor without harshness, roast a whole head of garlic and add a few cloves to the cheese spread. Roasting creates a sweeter, more mellow garlic flavor.
The Science Behind Perfect Cheese Melting
Creating the ideal melty texture in your Cheesy Garlic Chicken Wraps is actually a matter of food science. Different cheeses melt differently based on their moisture content, age, and acidity. Mozzarella, with its high moisture content, creates those appealing cheese pulls, while cheddar contributes sharp flavor and Parmesan adds savory depth.
For the best melting results, bring your cheese to room temperature before using it in your wraps. Cold cheese takes longer to melt and may result in overcooked wraps by the time the cheese reaches the desired consistency. The combination of cheeses in this recipe has been carefully selected to provide both optimal melting properties and complementary flavors.
Best Ways to Serve Cheesy Garlic Chicken Wraps
The best way to serve Cheesy Garlic Chicken Wraps is warm, sliced diagonally in half, with a variety of dipping options. Consider these serving suggestions:
- Pair with a side of marinara sauce or ranch dressing for dipping
- Serve alongside a crisp green salad dressed with light vinaigrette
- Create a wrap bar with additional toppings like avocado slices, jalapeños, and different sauces
- For a complete meal, serve with sweet potato fries or a cup of tomato soup
- Make mini versions as appetizers for parties or game day gatherings
- For a lunch box, wrap tightly in foil to keep warm until mealtime
- Complement with a side of pickled vegetables for a tangy contrast
- Serve with a fresh fruit salad for a sweet counterpoint to the savory wraps
- For a Mexican-inspired meal, pair with Mexican rice and refried beans
- Create a Mediterranean platter by serving with hummus, olives, and cucumber slices
- For a casual dinner party, cut into pinwheels and serve as finger food
Elevate Your Presentation
The visual appeal of food significantly impacts our enjoyment of it. To make your Cheesy Garlic Chicken Wraps look as good as they taste, consider these presentation tips:
- Serve on a wooden cutting board for a rustic, appealing look
- Arrange cut wraps at angles for visual interest
- Use small ramekins for dipping sauces
- Sprinkle fresh herbs like parsley or cilantro around the plate
- Add a small side of colorful veggies like cherry tomatoes or carrot sticks
- Wrap in parchment paper tied with kitchen twine for a café-style presentation
- For kids, cut into smaller portions and arrange in fun patterns
- Use garnishes that hint at the flavors inside, like a small sprig of rosemary or a garlic clove
Nutritional Information for Cheesy Garlic Chicken Wraps
Per serving (1 wrap):
- Calories: 480 kcal
- Protein: 32g
- Carbohydrates: 35g
- Fat: 23g
- Fiber: 3g
- Sugar: 4g
- Sodium: 720mg
- Calcium: 350mg
- Iron: 2mg
This nutritional profile makes Cheesy Garlic Chicken Wraps a balanced meal option with a good amount of protein for muscle maintenance, moderate carbs for energy, and calcium from the cheese. For a lighter version, use whole wheat tortillas and reduce the amount of cheese.

Making Healthier Cheesy Garlic Chicken Wraps
While these wraps are already relatively balanced, there are several modifications you can make to align them with specific dietary goals:
- Lower carb option: Use low-carb tortillas or large lettuce leaves instead of regular flour tortillas
- Higher protein version: Add Greek yogurt to the spread and increase the chicken portion
- Lower sodium adaptation: Use low-sodium cheese varieties and reduce added salt
- Higher fiber option: Use whole grain tortillas and add extra vegetables
- Lower fat alternative: Use reduced-fat cheese and Greek yogurt instead of mayonnaise
Remember that any modifications may slightly alter the texture and flavor of the final product. It’s often best to experiment with small changes first to find your perfect balance of nutrition and taste.
Storage & Leftovers
Cheesy Garlic Chicken Wraps store surprisingly well, making them perfect for meal prep. Here’s how to manage leftovers:
- Refrigeration: Store assembled but uncooked wraps in the refrigerator for up to 2 days, wrapped tightly in plastic wrap or aluminum foil.
- Freezing: Fully cooked Cheesy Garlic Chicken Wraps can be frozen for up to 3 months. Wrap each individually in aluminum foil, then place in a freezer bag.
- Reheating from refrigerated: Warm in a skillet over medium-low heat for 3-4 minutes per side or microwave for 1-2 minutes until heated through.
- Reheating from frozen: Thaw overnight in the refrigerator, then reheat in a 350°F oven for 15 minutes, or unwrap and microwave for 2-3 minutes.
- Best for meal prep: Keep the chicken mixture and cheese spread separate from the tortillas, then assemble fresh wraps throughout the week.
Food Safety Tips
When storing and reheating Cheesy Garlic Chicken Wraps, keep these food safety guidelines in mind:
- Refrigerate leftovers within two hours of cooking to minimize bacterial growth
- Store different components (chicken mixture, cheese spread) in separate airtight containers
- Never leave wraps at room temperature for more than two hours
- When reheating, ensure the internal temperature reaches at least 165°F (74°C)
- If freezing, label containers with the date to track freshness
- Discard any leftovers that show signs of spoilage, regardless of storage time
Seasonal Variations of Cheesy Garlic Chicken Wraps
One of the beauties of this versatile recipe is how easily it can be adapted to incorporate seasonal produce. Here are some seasonal variations to consider:
Spring Cheesy Garlic Chicken Wraps:
- Add fresh asparagus spears (lightly blanched)
- Include tender spring peas
- Mix in fresh herbs like chives and dill
Summer Cheesy Garlic Chicken Wraps:
- Add grilled zucchini strips
- Include fresh corn kernels
- Top with heirloom tomato slices and basil
Fall Cheesy Garlic Chicken Wraps:
- Add roasted butternut squash cubes
- Include sautéed kale
- Mix in toasted pumpkin seeds for crunch
Winter Cheesy Garlic Chicken Wraps:
- Add roasted root vegetables like carrots or parsnips
- Include caramelized Brussels sprouts
- Mix in cranberries for a sweet-tart element
These seasonal adaptations keep the basic Cheesy Garlic Chicken Wraps concept fresh and exciting throughout the year while making the most of available produce.
FAQs for Cheesy Garlic Chicken Wraps
Can I freeze Cheesy Garlic Chicken Wraps?
Yes, you can freeze Cheesy Garlic Chicken Wraps. For best results, prepare and cook the wraps as directed, then let them cool completely. Wrap each wrap individually in aluminum foil, place in a freezer-safe bag, and freeze for up to 3 months. To reheat, thaw overnight in the refrigerator and warm in a 350°F oven for 15 minutes.
What can I use instead of chicken in Cheesy Garlic Chicken Wraps?
You can easily substitute the chicken in Cheesy Garlic Chicken Wraps with several alternatives. Try grilled shrimp, ground turkey, sliced steak, chickpeas, black beans, or portobello mushrooms. For a vegetarian option, firm tofu or tempeh works well when seasoned with the same spices used for the chicken. The garlic and cheese flavors complement all these protein options beautifully.
How do I prevent my wraps from getting soggy?
To prevent your Cheesy Garlic Chicken Wraps from becoming soggy, make sure your filling has cooled slightly before assembly. Another trick is to spread a thin layer of the cheesy garlic mixture over the entire tortilla as a moisture barrier. Additionally, if packing for lunch, wrap in parchment paper first, then aluminum foil, and keep any wet ingredients like tomatoes separate until ready to eat.
Can I make Cheesy Garlic Chicken Wraps ahead of time for a party?
Absolutely! For party preparation, assemble your Cheesy Garlic Chicken Wraps up to 24 hours in advance, but don’t cook them. Store them covered in the refrigerator with plastic wrap. When guests arrive, cook the wraps as directed and slice into halves or quarters for serving. You can also prepare all components separately and set up a DIY wrap station for a fun, interactive party food option.
How can I make these wraps spicier?
To add heat to your Cheesy Garlic Chicken Wraps, there are several easy additions: mix cayenne pepper or red pepper flakes into the chicken seasoning, add sliced jalapeños or serrano peppers to the vegetable mix, incorporate hot sauce into the cheese spread, or serve with spicy salsa on the side. You can customize the heat level to your preference by adjusting the amount of spicy ingredients.
Are Cheesy Garlic Chicken Wraps suitable for children?
Yes, Cheesy Garlic Chicken Wraps are very kid-friendly. The familiar flavors of chicken and cheese appeal to most children. For pickier eaters, you can simplify the wrap by reducing or omitting some of the vegetables or serving them deconstructed with each element separate. Many parents report that these wraps are an excellent way to introduce new flavors to children in a format they already enjoy.
How do I make these wraps for a large group?
For serving a crowd, prepare all components (chicken mixture, cheese spread, vegetables) in advance and keep them warm in separate containers. Set up an assembly line with all ingredients and let guests build their own wraps. Alternatively, pre-assemble the wraps and keep them warm in a low oven (200°F) for up to 30 minutes before serving. For very large groups, consider making mini versions that are easier to handle as finger food.
Related Recipes
If you love these Cheesy Garlic Chicken Wraps, try our other quick and delicious meal ideas:
- Buffalo Chicken Quesadillas – The perfect spicy alternative with the same easy preparation
- Mediterranean Chicken Pita Pockets – A lighter option with fresh, bright flavors
- Crispy Chicken Taquitos – A fun, crunchy twist on the wrap concept
- Spinach Artichoke Chicken Flatbreads – Open-faced version with the same cheesy goodness
- One-Pan Garlic Parmesan Chicken Pasta – When you’re craving the same flavors in a hearty pasta dish
- Greek Chicken Gyros – A Mediterranean-inspired alternative to traditional wraps
- Chicken Fajita Lettuce Wraps – A lower-carb option with similar flavors
- Cheesy Chicken Enchiladas – When you want those same flavors in a baked format
The Cultural Significance of Wrap Cuisine
The concept of wrapping food in bread or similar vehicles crosses cultural boundaries and has existed for centuries across the globe. From Mexican burritos to Greek gyros, Middle Eastern shawarma to Chinese spring rolls, the idea of portable, contained meals has universal appeal. Cheesy Garlic Chicken Wraps represent a modern American fusion approach to this concept, combining convenience with satisfying flavors.
The popularity of wraps in contemporary cuisine speaks to our increasingly mobile lifestyles and desire for complete, balanced meals that can be easily transported. As work schedules, commutes, and family activities become more demanding, recipes like Cheesy Garlic Chicken Wraps provide solutions that don’t sacrifice quality or nutrition.
By making these wraps at home, you’re participating in the evolution of comfort food – taking control of ingredients, customizing to your preferences, and creating restaurant-quality food in your own kitchen. This empowerment is part of what makes home cooking so satisfying in today’s food landscape.
Conclusion & Call to Action
Now that you’ve mastered the art of making the best Cheesy Garlic Chicken Wraps at home, it’s time to get creative in your kitchen! This versatile recipe welcomes customization, so don’t be afraid to experiment with different vegetables, cheeses, or even protein options. The combination of tender chicken, aromatic garlic, and melty cheese wrapped in a warm tortilla creates a satisfying meal that’s sure to become a regular in your recipe rotation.
These wraps represent the perfect balance of convenience and quality – proving that fast food can also be real food when you make it yourself. The skills you’ve learned in this recipe – from properly cooking chicken to creating balanced flavor profiles – are transferable to countless other dishes in your culinary repertoire.
Have you tried making these Cheesy Garlic Chicken Wraps? We’d love to hear your variations and serving suggestions in the comments below! Don’t forget to share this recipe with friends and family looking for quick, delicious meal ideas. Tag us in your creations on social media and let us know how your wraps turned out!
Happy cooking, and enjoy your delicious homemade Cheesy Garlic Chicken Wraps!
Print
15 Best Cheesy Garlic Chicken Wraps Recipe
- Total Time: 30
- Yield: 6 wraps 1x
Description
These delicious Cheesy Garlic Chicken Wraps combine tender chicken, gooey cheese, and aromatic garlic in a portable, customizable package. Perfect for busy weeknights, lunch boxes, or casual entertaining, they’re ready in just 30 minutes and packed with flavor!
Ingredients
For the Chicken Filling:
- 2 tablespoons olive oil
- 1½ pounds boneless, skinless chicken breasts, cut into thin strips
- 4 cloves garlic, minced
- 1 teaspoon Italian seasoning
- ½ teaspoon paprika
- Salt and pepper to taste
- 1 medium onion, thinly sliced
- 1 red bell pepper, sliced into strips
- 1 yellow bell pepper, sliced into strips (optional)
For the Cheesy Garlic Spread:
- 4 ounces cream cheese, softened
- 2 tablespoons mayonnaise
- 2 cloves garlic, minced
- ½ cup mozzarella cheese, shredded
- ¼ cup Parmesan cheese, grated
- 1 tablespoon fresh parsley, chopped
- ½ teaspoon dried oregano
For Assembly:
- 6 large flour tortillas (10-inch size)
- 2 cups mixed cheese (cheddar and mozzarella), shredded
- Fresh spinach leaves (optional)
- Fresh tomato slices (optional)
- Sliced avocado (optional)
- Fresh cilantro or basil leaves (optional)
Instructions
Step 1: Prepare the Chicken
- Heat olive oil in a large skillet over medium-high heat.
- Season chicken strips with salt, pepper, paprika, and half of the Italian seasoning.
- Add chicken to the hot skillet and cook for 5-6 minutes until golden brown and nearly cooked through.
- Add the minced garlic and cook for another 30 seconds until fragrant.
- Remove chicken to a plate and set aside.
Step 2: Cook the Vegetables
- In the same skillet, add a bit more oil if needed.
- Add sliced onions and bell peppers.
- Sauté for 4-5 minutes until vegetables are tender-crisp.
- Season with remaining Italian seasoning, salt, and pepper.
- Return chicken to the skillet, stir to combine with vegetables, and remove from heat.
Step 3: Prepare the Cheesy Garlic Spread
- In a medium bowl, combine softened cream cheese and mayonnaise.
- Add minced garlic, mozzarella cheese, Parmesan cheese, chopped parsley, and dried oregano.
- Mix until well combined and creamy.
- Taste and adjust seasonings if needed.
Step 4: Assemble the Wraps
- Warm tortillas in the microwave for 15-20 seconds to make them more pliable.
- Spread a generous amount of the cheesy garlic mixture onto each tortilla.
- Place a portion of the chicken and vegetable mixture in the center of each tortilla.
- Sprinkle with additional shredded cheese.
- Add optional fresh spinach and tomato slices if desired.
- Fold in the sides of the tortilla, then roll up tightly from the bottom.
Step 5: Cook the Wraps
- Heat a clean skillet or griddle over medium heat.
- Place the assembled wraps seam-side down on the skillet.
- Cook for 2-3 minutes per side until golden brown and the cheese is melted.
- Alternatively, you can wrap them in foil and bake at 350°F (175°C) for 10 minutes.
Notes
Pro Tips:
- Marinate the chicken in advance with garlic, olive oil, and herbs for even more flavor depth.
- Don’t overcook the vegetables – keep them slightly crisp for better texture in your wraps.
- Toast the tortillas lightly before assembling for extra structure and to prevent sogginess.
- Make a double batch of the chicken filling and freeze half for quick wrap assembly later.
- For meal prep, store components separately and assemble just before eating to maintain optimal texture.
Storage Instructions:
- Refrigerate assembled but uncooked wraps for up to 2 days, wrapped tightly in plastic wrap.
- Freeze cooked wraps for up to 3 months. Wrap individually in foil, then place in a freezer bag.
- Reheat refrigerated wraps in a skillet over medium-low heat for 3-4 minutes per side.
- Reheat frozen wraps in a 350°F oven for 15 minutes after thawing overnight.
- Prep Time: 15
- Cook Time: 15
- Category: Main Dish
- Method: Stovetop
- Cuisine: American Fusion
Nutrition
- Serving Size: 1 wrap
- Calories: 480
- Sugar: 4
- Sodium: 720
- Fat: 23
- Saturated Fat: 9
- Unsaturated Fat: 12
- Trans Fat: 0
- Carbohydrates: 35
- Fiber: 3
- Protein: 32
- Cholesterol: 85
Keywords: cheesy garlic chicken wraps, easy chicken wraps, chicken wrap recipe, garlic chicken, cheesy wrap, quick dinner recipe, meal prep lunch